
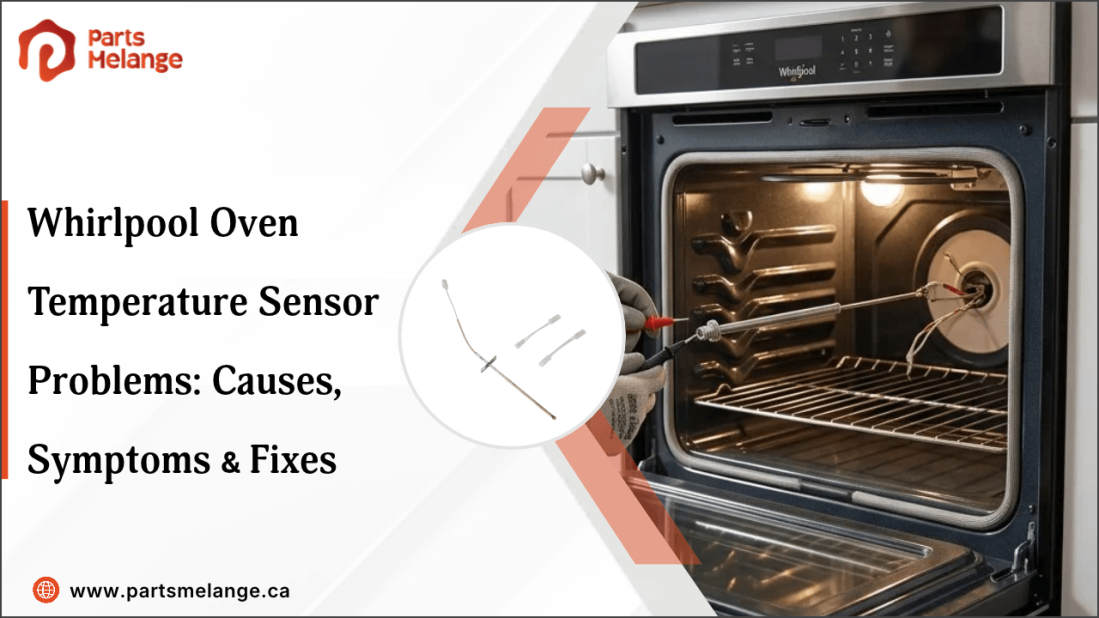
A Whirlpool oven temperature sensor helps monitor the heat inside the oven and sends temperature information to the electronic control. If the sensor becomes damaged or gives an incorrect reading, the oven may overheat, underheat, take longer to preheat, or produce inconsistent cooking results.
Temperature sensor problems can be caused by physical damage, incorrect resistance, loose wiring, or issues with the control board. Replacing the faulty components with compatible Whirlpool parts can help restore proper oven performance and accurate temperature readings.
This blog explains common Whirlpool oven temperature sensor problems, their symptoms and causes, troubleshooting steps, and how to replace a faulty sensor.
What Is a Whirlpool Oven Temperature Sensor and How Does It Work?
A Whirlpool oven temperature sensor is a thin metal probe that sticks out from the back wall inside the oven, usually near the top. It's small, but it's the main part the oven relies on to know how hot it is inside. The sensor works like a resistance temperature detector (RTD), which means its electrical resistance changes in a predictable way as the temperature changes.
Here is how Whirlpool oven temperature sensor works in practice:
The electronic control sends a small current through the probe and reads its resistance.
As the oven heats up, the resistance rises, and the control converts that number into a temperature.
At room temperature, most Whirlpool sensors read around 1,000 to 1,100 ohms.
The resistance keeps climbing steadily as the oven gets hotter, giving the control a live reading of the temperature inside the oven.
The control compares that reading with the temperature you set, heating elements on and off to keep the oven at that temperature.
For example, when a Whirlpool oven is set to 350°F (177°C), the temperature sensor continuously monitors changes inside the oven cavity by changing its electrical resistance as the temperature changes. The electronic control interprets this resistance as a temperature reading and uses the information to regulate the heating components. As the oven approaches the selected temperature, the control adjusts the heating cycle to maintain the desired cooking temperature. If the sensor provides an incorrect resistance reading, the oven may overheat, underheat, cycle improperly, or display a temperature-related error.
Need a replacement Whirlpool oven temperature sensor? PartsMelange provides compatible home appliance replacement parts to support targeted oven repairs, including temperature sensors, heating elements, control boards, and other essential components for restoring proper cooking performance.
Common Symptoms of a Faulty Whirlpool Oven Temperature Sensor
A faulty Whirlpool oven temperature sensor can send incorrect temperature readings to the control board, causing the oven to heat differently from the selected setting.
Common symptoms of a faulty Whirlpool oven temperature include:
Oven Temperature Is Too High or Too Low
The oven may consistently cook food faster or slower than expected. For example, food may brown too quickly even when the oven is set to 350°F. An inaccurate sensor reading can cause the control to regulate the heating cycle incorrectly.
Whirlpool Oven Takes Too Long to Preheat
A faulty sensor can affect how the control manages the heating cycle, causing the oven to take longer than expected to reach the selected temperature. A weak or failed heating element can produce a similar symptom, so the sensor should be tested before replacement.
Whirlpool Oven Overheats
The oven may become significantly hotter than the selected setting if the sensor sends an inaccurate temperature signal. The control may continue the heating cycle because it does not receive the expected temperature reading.
Whirlpool Oven Is Not Heating Properly
A faulty sensor can cause the oven to heat inconsistently, stop heating at the wrong point, or struggle to maintain the selected temperature. However, a failed bake element, wiring problem, or control board can cause similar symptoms.
Temperature-Related Error Code Appears
Some Whirlpool ovens display an error code when the temperature sensor circuit is open, shorted, or producing a reading outside the expected range. The specific code depends on the oven model, so check the model-specific technical information before diagnosing the sensor.
Cooking Results Are Inconsistent
Food may repeatedly come out undercooked, overcooked, or unevenly browned even when the same temperature is selected. If the problem occurs consistently, compare the actual oven temperature with the displayed setting and test the sensor before replacing other components.
These symptoms can also be caused by heating elements, wiring, calibration, or the control board, so test the temperature sensor before replacing it. When a faulty component is identified, the appropriate oven replacement parts can help restore normal heating and oven performance.
What Causes Whirlpool Oven Temperature Sensor Problems?
Whirlpool oven temperature sensor problems can develop because of sensor damage, wiring faults, incorrect resistance, or problems with the electronic control. The following table summarizes common causes, their effects, and what to check:
Cause | Effect on Oven Performance | What to Check |
Damaged temperature sensor | Sends inaccurate temperature readings to the control | Inspect the probe for bending, cracks, or burn marks |
Incorrect sensor resistance | Causes the control to receive an incorrect temperature signal | Test the sensor with a multimeter |
Loose or damaged wiring | Interrupts the signal between the sensor and control board | Check connectors, wires, and terminals |
Sensor out of position | Prevents the sensor from accurately measuring cavity temperature | Make sure the sensor is securely mounted in its original position |
Faulty control board | May misinterpret the sensor signal or control heating incorrectly | Follow the model-specific diagnostic procedure |
Calibration issue | Causes the actual oven temperature to differ from the selected setting | Check the oven's temperature calibration |
These causes can produce similar symptoms, so inspect the sensor and wiring before replacing any components. If both test normally, the electronic control and oven calibration should be checked next.
How to Troubleshoot a Whirlpool Oven Temperature Sensor
Troubleshooting a Whirlpool oven temperature sensor involves checking the oven's heating behaviour, inspecting the sensor and wiring, and testing its resistance.
Follow the below steps to troubleshoot temperature sensor in Whirlpool ovens:
1. Check the Oven's Temperature Behaviour: Start by observing how the oven performs during a normal heating cycle. Check whether it reaches the selected temperature, takes unusually long to preheat, overheats, or struggles to maintain the set temperature.
Also note any temperature-related error code displayed by the oven. The code can help identify whether the control has detected a sensor or sensor-circuit problem.
2. Inspect the Sensor for Visible Damage: Turn off power to the oven and allow it to cool completely. Inspect the temperature sensor inside the oven cavity for:
Bending or physical damage
Burn marks or corrosion
Loose mounting
A damaged probe or connector
Make sure the sensor remains in its original position and is securely mounted.
3. Check the Sensor Wiring and Connections: Inspect the wiring between the sensor and the electronic control. Look for loose connectors, broken wires, damaged insulation, or burned terminals.
A damaged connection can interrupt the sensor signal even when the sensor itself is functioning correctly.
4. Test the Sensor's Resistance With a Multimeter: Disconnect power before testing. Disconnect the sensor from its wiring harness and set a multimeter to the resistance (Ω) setting.
Place one probe on each sensor terminal and record the reading. The sensor should show a measurable resistance that changes with temperature.
5. Compare the Reading With the Manufacturer's Specifications: Compare your measurement with the resistance specification for the exact Whirlpool oven model.
Many Whirlpool oven sensors measure around 1,000–1,200 Ω at room temperature, but the specified value and acceptable range can vary by model. A reading that is open, shorted, or outside the model's specified range can indicate a faulty sensor.
6. Check the Control Board if the Sensor Tests Normally: If the sensor resistance is within specification and the wiring is intact, the electronic control may be responsible for the problem. The control receives the sensor signal and uses it to manage the heating components.
At this stage, check the model-specific wiring diagram and diagnostic procedure before replacing the control board. If testing confirms the board is faulty, replacing it with the right oven control board can help restore proper temperature regulation.
Following these steps helps separate a faulty temperature sensor from wiring, heating-component, calibration, or control-board problems.
How to Fix or Replace a Whirlpool Oven Temperature Sensor
If testing confirms that the Whirlpool oven temperature sensor is faulty, replacing it with the correct model-specific sensor can restore accurate temperature readings.
Follow these steps to replace a Whirlpool oven temperature sensor:
Step 1: Turn Off the Power
Switch off the oven's circuit breaker before starting the repair. Allow the oven to cool completely so the sensor and surrounding area are safe to handle.
Step 2: Locate the Temperature Sensor
Find the sensor inside the oven cavity, usually mounted on the rear wall. It is a small metal probe held in place with a mounting screw.
Step 3: Remove the Mounting Screw
Use the appropriate screwdriver to remove the screw securing the sensor. Keep the screw nearby because it will be needed to install the replacement.
Step 4: Pull the Sensor Forward
Carefully pull the sensor forward far enough to access its wiring connector behind the oven wall. Avoid pulling on the wires, as the connector can be damaged or pulled loose.
Step 5: Disconnect the Old Sensor
Disconnect the sensor from the wiring harness and remove the old sensor completely. Check the connector for signs of burning, corrosion, or damage before installing the replacement.
Step 6: Connect the Replacement Sensor
Connect the new temperature sensor to the wiring harness. Make sure the connector is fully seated and the wires are not pinched or pulled tightly.
Step 7: Secure the New Sensor
Position the replacement sensor in the same location and orientation as the original. Reinstall the mounting screw and make sure the sensor is firmly secured.
Step 8: Restore Power and Test the Oven
Turn the circuit breaker back on and run the oven through a normal heating cycle. Check that it preheats normally, reaches the selected temperature, and does not display the previous temperature-related error.
Use a compatible oven temperature sensor replacement that matches the exact Whirlpool oven model, because sensor resistance specifications and connectors can vary between models. If the oven still has temperature problems after replacement, check the wiring and control circuit before replacing additional components.
Check out RF, Infrared & Convection Ovens: The Smart Upgrade from Traditional Microwaves to explore advanced heating technologies and improved cooking performance.
Summary: Prevent Future Whirlpool Oven Temperature Sensor Problems
A Whirlpool oven temperature sensor plays an important role in maintaining the selected cooking temperature. Keeping the sensor clean, securely positioned, and free from physical damage can help maintain accurate temperature readings. Avoid hitting or bending the sensor when cleaning the oven or moving racks.
If the oven starts overheating, underheating, or taking unusually long to preheat, inspect the sensor, wiring, and connections before replacing parts. When replacement is necessary, use a sensor that matches the exact Whirlpool oven model and its specified resistance.
Key Takeaways
Inspect the sensor for physical damage or displacement.
Check sensor wiring and connectors for loose or damaged connections.
Test sensor resistance against the model-specific specification.
Check calibration if the oven temperature is slightly inaccurate.
Use the correct replacement sensor for the oven model.
If the sensor and wiring test normally, investigate the control board and heating system.
FAQs
How do I know if my Whirlpool oven temperature sensor is bad?
A faulty sensor may cause inaccurate temperatures, slow preheating, overheating, inconsistent cooking, or error codes. Test its resistance with a multimeter and compare it with your model's specification.
Can a faulty temperature sensor cause a Whirlpool oven not to heat?
Yes. An incorrect sensor signal can affect heating control and prevent normal operation. However, heating elements, wiring, power supply, or the control board can also cause heating problems.
How do I test a Whirlpool oven temperature sensor with a multimeter?
Turn off power, disconnect the sensor, and set the multimeter to ohms. Measure across both terminals, then compare the resistance reading with the specification for your exact Whirlpool oven model.
How much does it cost to replace a Whirlpool oven temperature sensor?
Replacing a Whirlpool oven temperature sensor typically costs $130–$260 professionally, including parts and labour. DIY replacement may cost $25–$120 for the sensor, depending on the model and compatible replacement part.
Disclaimer: This blog provides general information on Whirlpool oven temperature sensor troubleshooting and replacement. Information may vary by oven model. |




Please complete your information below to login.
Sign In
Create New Account